For those of you working on the Statesville house, below is addition design program information we obtained at the progress meeting.
● Step the house down the slope of the site. Josh B. submitted some massing drawings that are very powerful in showing how well this approach fits the site. Three levels is the optimal number of levels.
- The upper (street) level contains the office with an outside entrance, a patio and/or deck, and the entry to the living quarters of the house. One parti presented by Alek K. for this level is a two-story block. The first story contains an entrance leading to a flight of stairs that descend into living quarters and a second flight of stairs that rise into the office. The back of the entry opens onto a patio and/or roof deck (over the middle level) that accounts for the majority of floor area of the first story (of the upper level). The second story of the upper level is accessible from both the first floor entry and a second entrance with direct access to the street. It contains an office, work room / conference area and a unisex restroom. The second story provides cover for part or all of the first floor patio and/or deck.
- The middle level contains the living room, kitchen, dining room, powder room and another patio and/or deck. The preferable location for the patio and/or deck is south or southeast of the conditioned spaces. Provide a transition zone at the interface of the patio / deck and the condition spaces. Ideally there will be three distinct occupiable zones – conditioned (interior) spaces, semi-enclosed unconditioned spaces, and open outdoor spaces – that flow seamlessly together. (Sorry for the archi-speak.) A key function of this patio / deck is to serve as a focal point for organizing the entire site. Among other things, a trail that winds down to the creek at the bottom of the site will originate from it.
- The lower level contains the bedrooms and bathrooms. Think about how to capture view sheds of the site while preserving privacy. Some of the best examples of student work that do this are the Perry Lake Bathrooms (outhouses) done by Rural Studio. The images on their web site do a poor job of showcasing how successful the designs are, but take a look if you are not familiar with the work - http://www.cadc.auburn.edu/soa/rural-studio/projects_bathrooms.htm.
● The house will have a steel frame with light gauge metal studs framing. Keep it simple! As much as possible, use trabeated systems consisting of simply supported wide flange beams and open web steel joists. Cantilevered beams are acceptable for creating covered patio / deck areas. You can find more information about open web steel joists at the Vulcraft web site. Follow this link to download the catalog, http://www.vulcraft.com/downloads.htm#Catalogs. Limit your joist selections to the K series to keep cost down. For the floors use on grade slabs for the grade levels, and metal decking with concrete topping for the above grade levels.
● Low-slope (“flat”) roofs are acceptable, and in some places necessary. Steep-pitched roofs (2:12 or more) are also acceptable but are not required.
● Run flooring materials in the conditioned (interior) spaces adjacent to the patios / decks out onto the patios / decks. Possible materials include tile and sealed concrete.
It is time to head home so I will post more later.
Tuesday, June 24, 2008
Friday, June 20, 2008
Just a couple questions
An introduction: I am a graduate architecture student at NC State interning at Self-Help.
I could be misreading the drawings, but it looks like the elevations and roof plan don't match quite right. The west and south elevations show two offset gables, one running into the other on the south slope. The roof (site) plan shows one main gable above two lower hips. Maybe the plan changed and one of the drawings wasn't updated, or I could just be wrong! Also I was wondering how the large windows on the south facade will be shaded in the summer. Is the idea to use the two-story living area as a stack-effect chimney (as in the Dwell article), and if so, how does the warm air escape from the upper level? I didn't see any of the schematic design drawings, and maybe these questions were covered there, but I'm just curious. Thanks!
I could be misreading the drawings, but it looks like the elevations and roof plan don't match quite right. The west and south elevations show two offset gables, one running into the other on the south slope. The roof (site) plan shows one main gable above two lower hips. Maybe the plan changed and one of the drawings wasn't updated, or I could just be wrong! Also I was wondering how the large windows on the south facade will be shaded in the summer. Is the idea to use the two-story living area as a stack-effect chimney (as in the Dwell article), and if so, how does the warm air escape from the upper level? I didn't see any of the schematic design drawings, and maybe these questions were covered there, but I'm just curious. Thanks!
Thursday, June 5, 2008
Meeting with Grier Heights Client
We are scheduled to meet with Donnetta at 10:00 on Tuesday morning. She is our contact person for the Grier Heights project.
My thinking is a few of you want more time to work on your designs.
I will be in the college all day Friday and Monday, so please plan on seeing me if you want feedback on your design.
My thinking is a few of you want more time to work on your designs.
I will be in the college all day Friday and Monday, so please plan on seeing me if you want feedback on your design.
Wednesday, June 4, 2008
files
I know we have the LIH server folder, but will this blog allow us to post files i.e sketchup etc. files....from talk with others who have used a blog in there studios that was a useful tool.
Passive Cooling Idea
There is a story in one of the recent issues of Dwell Magazine highlighting a pretty unique system for passive cooling, and I think it might be interesting to see if we could incorporate this into our design. I don't know if the costs would be worth it, or if there would be space for it in the house, but I think it might be something we could at least look at. Here's the link to the article, which is about the house as a whole but focuses on the wind catcher/tower:
http://www.dwell.com/homes/new/17673594.html
What do you guys think?
http://www.dwell.com/homes/new/17673594.html
What do you guys think?
blog - June 3
Thomas,
In Carrie Gault's sustainability course we had a class blog greencoablog.blogspot.com where thoughts could be posted and commented on. It was very successful especially at the beginning of the course before studio got hectic. Also, I am working on a project with Deb Ryan where we are exploring the use of web 2.0 technologies to facilitate the planning process. This is just a thought, but perhaps we could have a blog for this project which would allow for a greater deal of collaboration. People could post comments to your postings and ask questions, and we could all benefit. Also, you would be able to moderate the conversation to make sure that it stayed on topic and productive. I would like to hear what other people have to say in response to your emails as well as what questions they are asking. This would also help those of us who cannot all gather to meet about the project to be a bit more involved.
Thanks!
nicole brown
RE: Plans and Elevations for Wednesday - June 3
Hello Josh and everyone else,
What I would like to see for Friday are sketches. The do not need to be hard line drawings from a CAD program, but they should not be chicken scratches.
Josh Baer came in this morning to show me his sketches. I should have scanned them because they were at the level of development I expect. Since I did not I will give you a brief description.
Freehand
Plans at scale
Walls drawn with two lines that are roughly to scale
Doors and windows
Furniture
North arrow
Minimal notes and no dimensions
Elevations done in Sketchup (freehand is alright)
Self-Help just e-mailed me to let me know they have the revised plat for the Grier Heights project. It is my plan to swing by their office this afternoon and pick it up. I will scan it and post it on the server.
The topo map a ordered for the Statesville project has yet to come in. Once it does I will do the same thing with it.
Thanks,
Thomas
Direct Gains and Sun Shading - June 2
Hello Everyone,
Let’s talk about sun shading and direct gains.
DIRECT GAINS
Direct gains is the simplest type of passive solar heating. It is called direct gains because the solar energy enters directly into the living spaces. As with most types of passive solar heating, there are three components to the system – south facing glazing, thermal mass and movable insulation.
South Facing Glazing
To discuss glazing orientation we need to cover some basic terms. The sun’s position in the sky is denoted by bearing and azimuth angles. The bearing angle is the horizontal angle off of due south. (If the sun is due east it has a bearing angle of 90 degrees east.) The azimuth angle is the vertical angle off of horizontal. (If the sun is directly overhead it has an azimuth angle of 90 degrees.) The incident angle of the sun is the angle measured between the position of the sun and a line perpendicular to the glazing surface. (If the position of the sun is perpendicular to the glazing it has an incident angle of zero.)
Solar radiation can be collected at all glazing orientations; however, during winters in the northern hemisphere, south facing glazing collects the greatest amount of solar radiation for a fixed orientation.
Winter gains can be increased further by tilting south facing glazing back off of vertical. Unfortunately, it also increase unwanted summer gains. The optimal tilt angle for solar glazing, in terms of the annual cycle, is vertical. Vertical glazing will have greater gains in the winter than in the summer, despite the fact there is more solar energy in the summer than in the winter. The reason why this happens is a function of azimuth and incident angles. In the summer the azimuth angle of the sun is much greater than it is in the winter. (The sun travels high in the sky during the summer, and low on the horizon during the winter.) The percentage of solar radiation falling on a glazing surface that passes through the glazing is a function of the incident angle. It is not a linear function. A high percentage of solar radiation passes through at incident angles of 45 degrees and less. At incident angles of 45 degrees and more the percentage of solar radiation passing though drops off dramatically. When the glazing is vertical, the incident angle in the summer is greater than 45 degrees for more of the time than it is in the winter, which results in less of the radiation passing through the glazing in the summer than in the winter. As a matter of fact, the summer reduction in percent passing is typically greater than the summer increase in available solar radiation, which results in less gain in the summer than in the winter.
One question that routinely comes up is, how close to due south do I need to orient the glazing? Before I answer that question I want to go over a simple relationship. The bearing angle of the sun changes 15 degrees in one hour. (That makes sense if you think about the sun taking 24 hours to travel 360 degrees around the earth. Granted, Nicholaus Copernicus would take exception to that explanation, but you get the point.)
One of the critical concerns with passive solar heating is to minimize daily temperature fluctuations. Passive solar houses tend to be cool in the morning and warm in the afternoon. Since the bearing position of the sun changes 15 degrees with every hour, and solar gains drop off dramatically at incident angles greater than 45 degrees, there is a six hour opportunity to collect solar energy. If the glazing is oriented due south, the opportunity to collect solar energy is from 9:00 in the morning to 3:00 in the afternoon. Shifting the orientation of the glazing 15 degrees east of due south will shift the start time for collecting solar energy to 8:00 in the morning, and shift the cut off time to 2:00 in the afternoon. This shift will help reduce temperature swings by reducing the cool down in the morning and overheating in the afternoon. (These times are solar times, which differ from clock time. Think about it this way. If it is solar noon for only the instant the sun is highest in the sky, then there is only one longitudinal location on the earth corresponding with that instant. Since each time zone covers a wide longitudinal swath there is no way it can be solar noon at clock noon for the entire time zone. Solar time also does not change with daylight saving time, so when it is 10:00 DST it is 9:00 solar time.)
Please keep in mind there are limits to shifting the bearing orientation. The more we shift the orientation to the east the less winter solar radiation we collect. A 15 degree shift reduces gains approximately 4 percent. Shifting the orientation off of due south also increase summer gains by allowing more of the summer solar radiation to strike the surface at an incident angle of 45 degrees or less. Given these limitation, the optimal orientation for vertical glazing is about 15 degrees east of due south.
The only other thing that needs to be discussed at this time is the amount of glazing required. The amount of glazing required for a direct gains solar house in Charlotte is approximately 20 to 25 percent of the floor area being heated. For a house of 1,200 to 1,400 square feet a total of 240 to 350 square feet of glazing is required. This is far more than a couple of large picture windows. You most likely will need to think about designing a glazed curtain wall.
One more point before we move on to thermal mass. Horizontal glazings are not energy efficient in terms of thermal performance. They collect less heat than they loss in the winter, and they are a source of unwanted heat gains in the summer. If you look at the chart titled, Climate Consultant 3 Radiation Range, which located on the college server, you will see what I mean.
Thermal Mass
Answer this question, what happens when all the solar energy needed to heat a house for 24 hours is put into the house during a six hour period? If there is no thermal mass, the house become unbearably hot in the afternoon and unbearably cold just before sunrise. (Solar houses that have little or no thermal mass are called solar tempered houses. They save some energy, but are difficult to regulate.)
Thermal mass acts as a thermal flywheel. It dampens the high and low temperatures. The more thermal mass there is in the house the more it dampens the temperature swings. The most commonly used materials for thermal mass are water and concrete / masonry. Phase change materials (PCM) are sometimes used, but they are most likely beyond our budgets. One of the advantages of using concrete or masonry, verses water, is it can do double duty and be used as the structure for the house.
The three rules of thumb for using concrete or masonry thermal mass are, 1) provide 1 to 1-1/2 cubic feet of thermal mass for every square foot of glazing, 2) expose as much surface area of the mass to direct sunlight and/or high heat as possible; and, 3) distribute the thermal mass through out the house. Ideally, the house should have nine square feet of thermal mass surface area for every one square foot of glazing. For the glazing areas given above a total of 2,160 to 3,150 square feet of thermal mass is needed. This is 1.80 to 2.25 times more surface area than floor area. That is why well designed solar houses have concrete and/or masonry floors and walls. In some passive solar houses most of the interior partitions are masonry and/or concrete.
Another way to provide the surface area needed is to go with a hybrid system. Passive solar systems by definition do not use fans or pumps to move heat. Active solar systems, such as roof mounted flat plate collectors, use pumps and/or fans to move heat from the collectors to storage, like an under slab rock bin. Hybrid systems are a combination of the two systems, but tend to be more like a passive system. The house designed and built in Chicago by the students at IIT is a hybrid house. It uses a concrete floor and a masonry wall for thermal mass. However, more thermal mass was needed, so a rock bin was constructed under the concrete slab to store heat from the top of the atrium. (The atrium serves as a thermal chimney for stack effect cooling in the summer, and as a heat trap for hybrid heating in the winter.) Keep this in mind as you layout your plans.
Movable Insulation
Here is another question. If the glazing on a solar house is collection solar energy for six hours of the day, what is it doing for the other 18 hours? The answer is, it is losing energy. In fact, the amount of energy lost can equal or exceed the amount of energy gained. Using insulating glass units typically does not improve things because the additional layers of glazing reduces the solar gains as much as it reduces the losses.
The different types of movable insulation available are too numerous to go over in detail in this e-mail. There are exterior and interior shutters. There are curtains. There are systems that blow beads of insulation between layers of glazing. And the list goes on. What you need to keep in mind is you will need to include some sort of movable insulation. We will talk about this more when we get to design development.
SUN SHADING
I know this e-mail has gotten long so I will make this short. In order to work properly sun shading needs to be adjustable. The reason is, the geometry of the movement of the sun throughout the year is symmetrical around the summer solstice – June 21st, but annual heating and cooling loads are not. For example, the position of the sun on March 21st at 10:00 in the morning is the same as it is at 10:00 in the morning on September 21st. However, on March 21st we want solar gains; whereas, on September 21st we want sun shading. Fixed sun shading can not do both.
If you plan to use louvers for sun shading, keep in mind horizontal louvers work better on the south elevation, and vertical louvers work better on the east and west elevations.
We will talk about sun shading in greater detail during design development. What you need to know about sun shading is it makes direct gains suitable for Charlotte.
Thanks,
Thomas
Mechanical Room - June 1
Hello Everyone,
For both the Statesville house and the Grier Heights house, please include a mechanical room on the first floor for a gas fired furnace. It needs to be a minimum of six feet by six feet.
I know it is a common practice in the southeast to locate the gas furnace for a house in a crawl space, attic or outside; but this practice is energy inefficient. Ideally, the mechanical room should be located as close to the center of the house as possible, and facilitate straight runs of rigid metal duct to each end of the house. I also know it is a regional practice to use flexible duct for most of the ductwork in a house, but this too is an energy inefficient practice. Lastly, when we take the designs through design development we will develop the design so all of the ductwork runs entirely within the conditioned spaces of the house. Put another way, none of the ductwork will run through a crawl space, attic or outside. Again, this deviation from common practice is to increase energy efficiency. (The house being built in Durham by Self-Help has the furnace located in the attic, uses flexible ducts, and runs the ducts through the unconditioned attic. See the photographs in the folder labeled, “Gentry PHOTOS 080530”.)
Thanks,
Thomas
Wind Protection and Natural Ventilation - June 1
Hello Everyone,
This e-mail starts where I left off with the Psychrometric e-mail. In that e-mail I closed with, “All you have to do is design an envelope that provides sun shading and direct gains, as well as natural ventilation and wind protection.” I will now elaborate on how to resolve these seemingly contradictory requirements, starting with natural ventilation and wind protection.
I have designed housing for the high plains and mountains of Wyoming; and, I have designed housing for the Sonoran Desert of Arizona. Both of these places have extreme climate conditions. In the mountains the summers are mild and the winters are extremely cold. In the desert the winters are mild and the summers are extremely hot. Designing housing for each of these climates requires a single-mindedness. You are either designing to heat and conserve heat; or, you are designing to cool and defend against heat. (In practice this is a bit of an oversimplification, but conceptually it is accurate.)
Charlotte is located in a temperate climate. By definition a temperate climate is a climate that neither the heating season nor the cooling season dominates. According to the National Oceanic and Atmospheric Administration (NOAA), the mean normal heating degree days for Charlotte is 3,162 per year, and the mean normal cooling degree days is 1,681 per year. Single-minded think will not work.
The psychrometric chart from Climate Consultant 3 shows natural ventilation for cooling as being appropriate for 10.7% of the year, and wind protection as being appropriate for 5.9% of the year. So, how do we do both without one being at odds with the other?
Natural Ventilation
There are two basic types of natural ventilation, wind induced and stack effect.
When wind moves over and around a building it creates positive and negative pressure zones. Wind blowing around a building with a rectangular foot print will create positive pressure on the windward side of the building and negative pressure on the remaining three sides of the building. Wind blowing over a build with a sloped roof having a pitch of about 2 in 12 or more will create positive pressure on the windward slope and negative pressure on the leeward slope. Wind blowing over a building with a roof having a slope of 2 in 12 or less will create negative pressure over most, if not the entire roof. All you need to make wind induced ventilation work for you is to have wind, AND two openings in the building envelope, one in a zone of positive pressure and the other in a zone of negative pressure. Of course you are not guaranteed the wind will always blow from the same direction, so you will need more than two openings that can be control independently to make use of wind coming from any direction. There are also other issues concerning the cooling of objects and surfaces, verses people; but, I will save that talk for later.
The second type of natural ventilation is stack effect. This type of ventilation uses warm air to facilitate ventilation. To optimize this type of ventilation, a vertical “thermal stack” or “thermal chimney” is incorporated into the design. The way it works is warm air rises out of the top of the stack or chimney creating negative pressure within the house. Fresh air is brought into the house though open windows, doors and/or vents. The advantage of stack effect ventilation over wind induced ventilation is it works when there is no wind. Design guidelines for the cross-sectional area and height of the stack or chimney are available, but as a general rule, the taller the stack or chimney the better it works. Another rule of thumb for Charlotte’s climate is the cross-sectional area should be approximately ten percent of the floor area being serviced. That means for a house of 1,200 to 1,400 square feet, the thermal stack or chimney should have a cross-sectional area of 120 to 140 square feet. Obviously, this is much larger than the chimney on a residential fireplace. It is the size of a bedroom. Consequently, in energy efficient houses, spaces like, atriums, solariums, stair wells, and multi-story rooms are often designed to function as thermal chimneys. Again, there are other issues, which I will talk about later.
Wind Protection
There are two ways wind protection reduces unwanted heat losses and gains. The first way is it reduced conducted heat transfer through the building envelope by allowing a still air film to develop on the outside surfaces. Air is a very good insulator, so if a still air film is allowed to develop it reduces the rate of heat flow.
The second way wind protection reduces unwanted heat losses and gains is by reducing air infiltration. Air infiltration is the uncontrolled movement of air through the envelope. (Ventilation is the controlled movement of air through the envelope.) The rate of infiltration is expressed in air exchanges per hour. A house of average construction will have approximately one air exchange per hour. That means, the equivalent of all the air in the house is being replaced every hour. For most houses, air infiltration is the largest single source of unwanted heat losses and gains. It exceeds the conducted heat losses and gains associated with the windows and doors.
For these reasons, wind protection is listed as an appropriate design strategy. The problem is, how do you provide wind protection and natural ventilation, especially wind induced ventilation?
Designing for Wind Protection and Natural Ventilation
The first thing to do in designing for both wind protection and natural ventilation is to minimize infiltration. If there was no infiltration there would be little need for wind protection. Having said that, there are two reasons why this is unfeasible. First, with the exception of building an underground house, the cost of building a near airtight house would exceed our budget. Second, to maintain indoor air quality, a minimum rate of air exchanges must exist. A half an air exchange per hour is commonly considered to be the safe minimum. The balance point between these two issues is to build a reasonably tight house and maintain air quality through ventilation. If air quality is maintained with ventilation, rather than infiltration, there is the opportunity to use a heat recovery ventilator (HRV) or an energy recovery ventilator (ERV) to save energy. (We will focus on the design of the envelope, HVRs and ERVs in the design development phase.)
Let us move on to the air film. The importance of preserving an air film has become somewhat exaggerated with the development of better insulated buildings. In the not too distant past, it was common to build minimally insulated, if not un-insulated, walls and roofs. For this type of construction, the insulating value of the air film represents a significant portion of the total insulating value of the envelope. Now a day, codes require insulation in the walls and roofs. Consequently, preserving an air film is less important; especially, since its insulating value can be regained with a modest amount of additional building insulation. (As with infiltration, we will focus on this when we detail the envelope in the design development phase.)
Now some of you may be saying to yourself something like, “He didn’t resolve the contradictory requirements. He just marginalized one requirement to where it was longer a requirement.” Fair enough! So, for those of you that can not accept my solution, please read on.
If we were designing this house for the high plains of Wyoming we would want to provide some form of wind protection and would not worry too much about compromising wind induced ventilation. (As I said earlier, designing for this type of extreme climate requires a single-mindedness.) Two means of providing wind protection are with trees and berms.
Conifers, such as pines, firs and spruces, can be configured to form semi-permeable winter windbreaks. Semi-permeable windbreaks let some wind pass though but cast a deeper wind shadow than impermeable windbreaks, such as garden walls.
Berms (small hills) can be used to deflect the wind upward. The challenge in using berms is to prevent turbulent airflow from developing between the berms and the building envelope. Turbulent air will scourer the air film off the envelope.
Having these two means of providing wind protection at our disposal the only thing that needs to be known is where to place the trees and/or berms. For most of the high plains this is an easy call with the prevailing winter winds coming out of the northwest. And, since we are designing for an area with few features to alter wind direction it is a straightforward solution.
For our site in Charlotte, we can generate wind wheels, with Climate Consultant 3, that shows which directions the wind blows for each month of the year. (I have posted the wind wheels on the college server if you want to see them.) Looking at wind wheels it is clear there is not a dominate direction the wind blows. Furthermore, there is not a significant seasonal difference in direction or speed. Couple this information with the fact we are designing one house for an urban context, where countless features can alter wind direction, and the other house for a site with steep topography, and it becomes virtually impossible to make a meaningful decision about where to locate windbreaks.
The fact of the matter is, while wind protection is an appropriate design strategy in Charlotte it is not well suited for this project. If we were designing an expensive house we might think about designing a double skin house – what use to be called a double envelope house. This type of house uses an outer envelope to protect an inner envelope. Ventilation is achieved by aligning windows in both envelopes. When you want fresh air you open the window in the inner envelope and reach through to open the window in the outer envelope. (I designed and built three double envelope houses for the high plains and I can tell you they work.)
In the next e-mail I will talk about sun shading and direct gains.
Thanks,
Thomas
Grier Heights Meetings - June 1
Hello Everyone,
This week's schedule for the Grier Heights house is as follows.
Everyone that wants to submit a design to the client must meet with me no later than 5:00 on Wednesday afternoon. For our meeting you should bring floor plans and elevation. They do not need to be presentation quality at this time. My plan is to put several designs into the hands of the client by Friday afternoon. If we meet no later than Wednesday you should have plenty of time to refine your design and pull together respectable drawings.
I am about to finish writing the e-mail concerning natural ventilation and wind protection. It was my hope to send it out yesterday but it did not happen. After that e-mail goes out I will begin writing another e-mail on shading and solar gains.
Thanks,
Thomas
Grier Heights - Zoning and Program - May 31
Hello Everyone,
Yesterday I drove to Durham to me with folks at the main office for Self-Help, our client for the Grier Heights house. At the meeting I was given more information about the lot and what they want in the house design.
The lot is zoned R5. It is my understanding the lots are being developed as a Cluster Development; therefore, the rear setback is 20 feet instead of 35 feet. Follow the link below for more information on the zoning ordinance.
http://www.charmeck.org/Departments/Planning/Rezoning/City%20zoning%20Ordinance.htm
Self-Help is currently going through the process with the city to get approval for a private drive across the back of the lot to permit rear entry parking. That means there will not be a drive off of Leroy Street.
For the first house there want the following features.
● 1,200 to 1,400 sq ft
● 2 stories, first floor to be universally accessible
● 3 bedrooms with one bedroom on the first floor, most likely the master bedroom
● 2 bathrooms with one bathroom on the first floor (If you can configure or partition the first floor bathroom to function as a powder room for guests, all the better. Doing so requires providing access to the toilet and lavatory portion of the bathroom without going through the bedroom.)
● Front porch
I will try sending more information in an hour or two.
Thomas
Psychrometric Chart - May 28
Hello Everyone,
There are several ways to start designing an environmentally sustainable house so do not feel you have to do everything I say in the order I say it.
In terms of energy usage, houses are envelope dominated building. Larger buildings, like high-rises, are internal load dominated buildings. Energy demands for houses are dictated predominately by the envelope, which includes heating, cooling and lighting. Energy demands for high-rises are dictated predominately by internal loads, which includes HVAC fan energy, electric lighting, equipment and more. What you need to do is design a house that has an envelope that minimizes energy demands. Granted, there are additional issues that need to be addressed to design an environmentally sustainable house; however, none are more important than the energy performance of the envelope. (I will avoid this opportunity to go on a rant about carbon footprints, fossil fuel based energy, and global warming.)
If you are getting a head of me you are asking yourself, "What are the issues that need to be addressed in designing the envelope?"
A good place to start is to go to, http://www2.aud.ucla.edu/energy-design-tools/ and download the application, Climate Consultant 3. You will also need to download climate data files from a different site, which is linked to the web page.
To save time I have posted the chart you need in the LIH folder on the CoA server. Look for, “Climate Consultant 3 Psychrometric Chart”. Under the heading, “Design Strategies: January through December” you will find thirteen strategies for maintaining thermal comfort and the percentage of the year each will maintain thermal comfort without assistance. For example, number 8 is, Passive Solar Direct Gain [heating with] Low Mass, which will meet the heating loads for 12.0% of the year. Number 13 is, Conventional Heating, which is required for 40.3% of the year. What the chart does NOT make clear is, passive solar direct gains heating with low mass can be used in conjunction with conventional heating to offset the amount of conventional heating needed.
As you can see from the chart, there are several viable heating and cooling strategies that do not require fossil fuel based energy (natural gas and electricity from coal fired power plants). All you have to do is design an envelope that provides sun shading and direct gains, as well as natural ventilation and wind protection.
Enough for now, I need to head home.
More tomorrow,
Thomas
General Information May 28
Hello Everyone,
We have a folder on the CoA server. It is the LIH folder in the Recourses folder. I have post materials for the Statesville project.
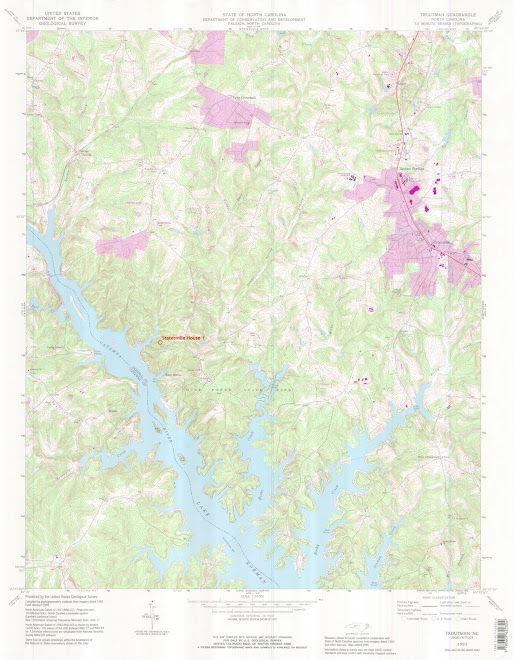
For those of you that were unable to make the site visit, I have posted an annotated panorama of the site to give you an idea of what we have to work with. To my eye it does not adequately show the steepness of the site. Today I ordered a 7 1/2 minute topo map from the USGS. I will scan and post it as soon as it arrives. Hopefully the contour intervals on that map will be tight enough to be helpful.
Regarding the CoA server, please feel free to add materials to the project folders. As for your student folders, Chris Tangora needs to hear from you if you want to have your student folders saved. The plan is to erase all of the students folders.
I know some of you are only a year or two into your architectural education and what is being asked of you might be overwhelming, so I will routinely send out e-mails with basic information to help you be productive. The first few will go out this afternoon.
Thanks,
Thomas
We have a folder on the CoA server. It is the LIH folder in the Recourses folder. I have post materials for the Statesville project.
For those of you that were unable to make the site visit, I have posted an annotated panorama of the site to give you an idea of what we have to work with. To my eye it does not adequately show the steepness of the site. Today I ordered a 7 1/2 minute topo map from the USGS. I will scan and post it as soon as it arrives. Hopefully the contour intervals on that map will be tight enough to be helpful.
Regarding the CoA server, please feel free to add materials to the project folders. As for your student folders, Chris Tangora needs to hear from you if you want to have your student folders saved. The plan is to erase all of the students folders.
I know some of you are only a year or two into your architectural education and what is being asked of you might be overwhelming, so I will routinely send out e-mails with basic information to help you be productive. The first few will go out this afternoon.
Thanks,
Thomas
Grier Heights Kickoff Meeting - original email May 27
Hello,
The kickoff meeting for the Grier Heights project will begin at 9:00 this coming Thursday morning. We will meet in room 255 of Storrs Hall for a brief discussion before heading down to the site. We should be done well before noon.
Sometime tomorrow morning we will have a folder on the server for both projects. I will upload all the information I have for both projects and send you an e-mail letting you know where to find the folder.
Have a good evening,
Thomas
Status of Summer Program and Paid Internships - original email May 27
Hello Everyone,
Attached are the letters that went out to our clients for the two projects we are working on this summer. As with any professional project, these documents are for your information and should not be shared with people outside of the program.
Following up on the discussion about paid internships that occurred at today's kickoff meeting, here is what I forgot to mention. Do to how the paid internships are being funded, we will not know the exact amount of money we have to work with until we get to 5th week of the Statesville project and the 6th week of the Grier Heights project. (Please refer to the attached letters for more details about the funding.) All of the work that is done before these dates is to be done by those willing to do unpaid internships and students participating in the program as an independent study. When the paid internships become available, they will go first to those people with the needed skills and availability to work 30 to 40 hours a week. For some of the internships there is the possibility to split the workload and stipend between two or more people. I will give you more information on this subject in the upcoming weeks.
Towards the end of today's site visit we had an informative discussion with Bob regarding his likes and dislikes. It sounds like we have the opportunity to design a unique house. Possibilities include, earth sheltering, green roofs, passive solar, living machines, hybrid cooling and more. This should prove to be an excellent opportunity to showcase your creativity.
Lastly, I also forgot to follow up on my early e-mail regarding a side job working on Bob's house. If you want to make money now and are willing to help Bob repair and remodel his house please contact him and let him know. I have include his v-card.
More later,
Thomas
Kickoff Meeting-original email May 25
Hello Everyone,
With the end of the Memorial Day holiday comes the beginning of design-build program. Both projects are shaping up to be interesting and challenging projects. This Tuesday, May 27th, at 1:00, we will have the first of two kickoff meetings. At this first meeting we will cover the details of the program and introduce you to the Huntersville housing project. The second kickoff meeting, which will cover the Grier Heights project, is tentative scheduled for Thursday, May 29th. The time has yet to be set, but it most likely will occur in the morning. Please plan on attending both meetings, if you can, regardless of which project you prefer to work. Please let me know if you will not be able to attend either meeting.
For those of you wanting to participate in this program as an architectural elective, please see Redeena in the college office.
For those of you wanting to participate in this program as a paid internship, I am still working out the details with the university and the clients; however, it is beginning to look like the paid internships will be structured with a required number of hours and lump sum stipends. The size of the stipends and the number of hours required for the internships has yet to be determined.
For those of you wanting to participate in this the program as an unpaid internship, or for IDP credits, it looks like the only thing that remains to be done is to fill out some forms. Unlike the paid internships there is no minimum number of hours you must work.
Below is a schedule of what will be covered during the first meeting.
Schedule for Huntersville Housing Project Kickoff Meeting
1:00 – 1:45 Introductions (Storrs Hall, room 255)
1:45 – 3:00 Travel to project site
3:00 – 4:30 Site visit
I will have enough room in my truck for three to four passengers, if you want or need a ride. Please bring whatever materials you typically use to document a site, such as, camera, notepad, and measuring tools. The site is steeply sloped and wooded, so please dress appropriately.
Thanks,
Thomas
Summer Internships/Independent Study/IDP - original email May 17
Hello Everyone,
Thank you for expressing an interest in working on one of two design-build housing projects being done in partnership with the Laboratory for Innovative Housing (LIH) in the College of Architecture.
The LIH has two distinctly different design-build housing projects planned for this summer. One project is market rate housing in Statesville, near Lake Norman. The lots are large, steeply sloped and wooded. The other project is affordable housing in the Grier Heights neighborhood of Charlotte. The lots are small, irregularly shaped, flat and open. The goal for both of these projects is to design several environmentally sustainable houses, and to assist in the construction of one house for each project.
The original plan was to have UNCC students work in paid internships. Due to requests from several of you, additional arrangements are being made. The plan is to offer paid internships, unpaid internships, IDP credits, or to do the work as an independent study for course credits.
Thanks,
Professor Gentry
Status of Summer Design-Build Program - May 16
Hello Everyone,
It is Friday evening and I want to bring you up to speed on a few things before I head home for the weekend.
1) A few of you have yet to turn in your information sheets. Please do so next week.
2) During the past week I have been working with various offices at the university to resolve issues regarding insurance, liability and contracts. Hopefully it will all be worked out shortly.
3) For the past few days I have been preparing a letter that outlines the summer program for the affordable housing project. It is my intention use the letter to get everybody that is involved in the program on the same page.
4) This weekend I will write a similar letter for the market rate housing project. I will meet with the client next week to set a start date.
5) Today I exchanged several e-mails with the client wanting to do the affordable housing. It was my hope to start on that project next week. They have requested we get started after Memorial Day.
6) The client wanting to do the market rate housing has a small side job. He want a few people to help his make repairs and improvements to his existing house. He wants to make the house more "green". There will be a limited amount of design work and plenty of hands-on construction work. Please let me know if you are interested.
7) For the summer, room 255 is Storrs has been designated as the temporary office for the Laboratory for Innovative Housing (LIH). Matt Parker is in the process of setting up an e-mail account and a web address for the LIH. If you are interested in helping design a web page for the LIH please let me know.
8) For those of you wanting to participate in the program as an independent study, Redeena has set up the course. The course number is ARCH 4890/6890 Section 005. 4890 is for undergrads and 6890 is for grads. Please let me know if you plan on enrolling.
Have a good weekend,
Thomas
Subscribe to:
Posts (Atom)